Growing In-Ground Figs in Zone 6a
We grow figs in ground at 1200ft elevation, latitude 48.5, growing zone 6a, in the rain shadow of the Cascade mountain range. It is a very dry area with hot summers and cold winters and less than 12 inches of annual precipitation (none during the summer). In 2023 we had 2 figs in the ground, a Chicago Hardy and another unknown variety acquired from a Polish friend in the Tacoma area, Milton Washington, which produces larger figs abundantly. Figs do not ripen all at once and in 2023 we harvested a 1½ cups every week for more than a month, at least 6 cups of figs from 2 small "bushes". In 2024 we got many new cuttings and expanded the fig collection to 90 trees, planted in the ground, a total of 46 varieties.
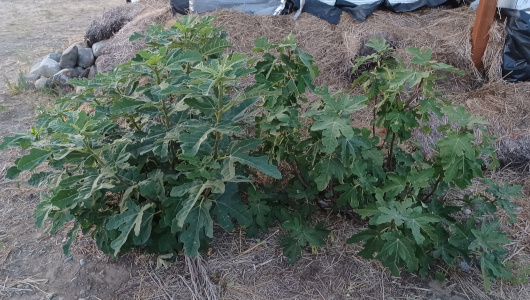
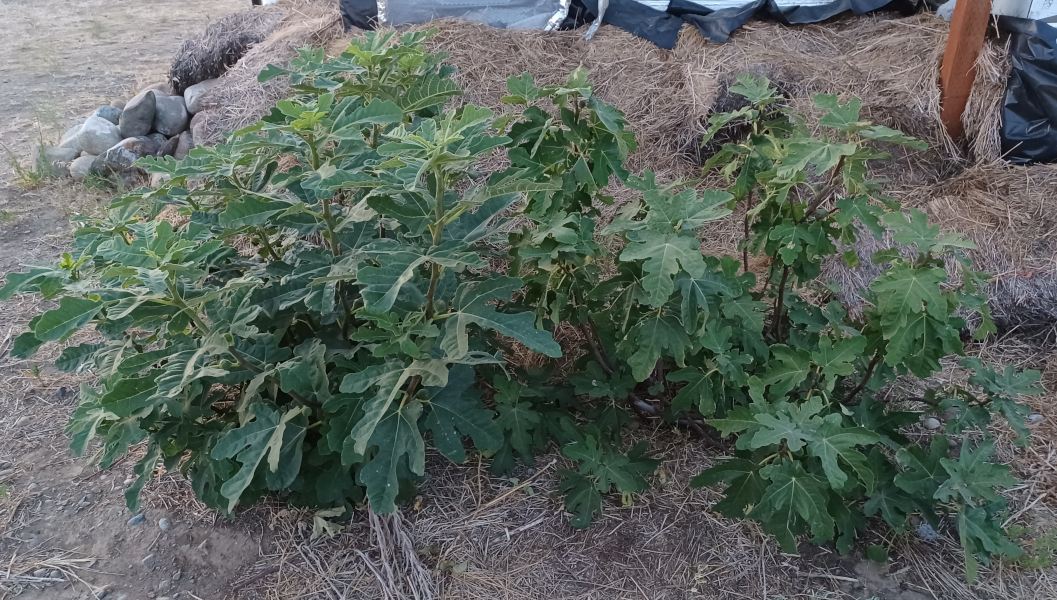
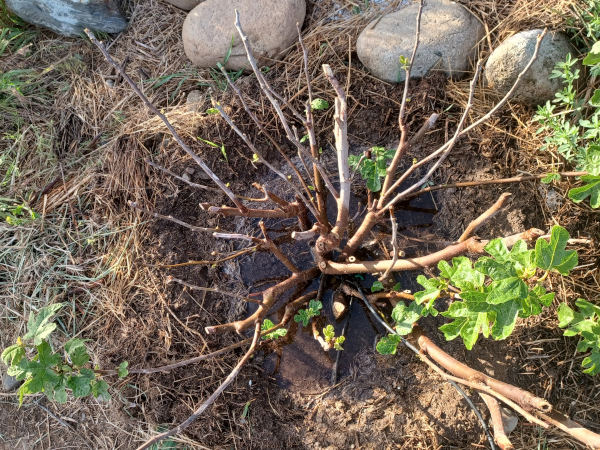
Fig Trees - Milton Left / Chicago Hardy Right
|

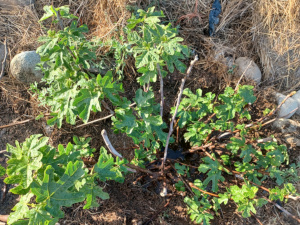
Milton Fig Tree
|

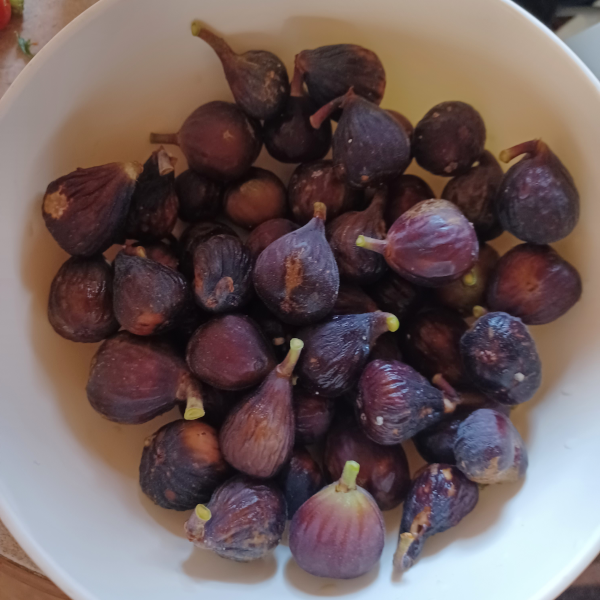
Bowl of Figs
|
In 2022 we had to reduce water usage and in 2023 we got very few berries but the fig trees produced well. We used a single 0.6 gpm dripper for 40 minutes a day for each fig tree and they yielded much more fig fruit than berries would have in a similar area. Figs can grow well in a cold environment, just cover them well in the winter and they grow back in the spring to produce figs in late summer/early fall. I used to cover my best tasting cold sensitive (Marion & Columbia Star) blackberries every winter, so the effort put into blackberries and figs is similar but figs, again, use less water and yield more. Compared to the effort put into blueberries, making pH adjusted fertilizer solutions, figs are again are the winner.
Winter Protection
Figs can be grown in the ground in short hedges and the covered with mulch and a tarp for winter protection. My figs are planted on the south west side of my trailer and the wind comes predominately from the north west and in addition to the mulch and tarp they were covered in a 3-4 ft snow drift most of the 2022/23 winter and the tarp had no snow cover 2023/24 winter with a low of -13°F. To prepare figs for temperatures below 21°F weigh or tie down the branches, pack mulch or straw 8-12 inches deep around and over the branches, and cover with a tarp folded 1-4 layers thick held down with rocks. To help above ground wood survive the cold, get the branches as close to the ground as possible. It is better to bend the branches down and tie them together or put rocks on top of the branches rather than cutting them. When I did it this way the old branches were still alive 6-18 inches from the crown even though temperatures reached -13°F with 16mph wind.
Covering fig trees with mulch and a tarp is enough protection for most in ground figs to at least zone 6a. We haven't tried using heat tape under the tarp yet but it doesn't seem very practical for everyone as electricity is not always available near fig plantings. If testing figs in zone 5 or colder consider growing near the south side of a building and trying with and without a heat tape. Please let us know your results on our Contact Page.
According to the growing zone map we are in growing zone 6b but our temperatures are 5°F colder than the weather station and 1 mile away and I did my own calculations based on NOAA records. By definition growing zone is the a 30 year average of the lowest annual temperature so I sorted all the daily lows for the past 31 years and the average was -2°F (zone 6b). This also means that on average half of the annual lows at the airport should be below -2°F which explains how the airport had a -13°F reading in Dec 2023. Our thermometer is 6 feet off the ground but our temperature measurements are 5°F or more colder than reported by the airport weather station. On June 16th 2024 a month after last expected frost date the airport recorded 37°F but we had frost damaged corn and ice accumulated on the windshield of the car at 5:30 am. Taking -2° and subtracting 5° is -7° (zone 6a). We are on the flats and unprotected from strong winds and the figs trees are only protected by a 33ft. trailer.
When to Cover Figs for Winter
Cover figs after they have dropped their leaves and before night temperatures drop below 21°F and un-cover figs after night temperatures are consistently above 32°F. You can uncover them earlier and let them break dormancy naturally if temperatures are consistentlly above 28°F, but if expecting a late frost cover the figs for the night or emerging buds could be damaged. Waiting too long to open in the spring can result in some mold growth on the stems.
Fig Tree Training
In 2023 I broke the thickest stem when tying down the branches so cut it down to where the wood wasn't split and tied the rest. This isn't a problem since there were many smaller branches and it is common to cut bigger branches that can't be bent and keep the flexible ones for next year. A traditional way to protect fig trees in winter is to partially cut the roots on one side and lay the tree horizontally and bury it. Wrapping the tree to protect from cold and drying will work in milder growing zones. The method I prefer is to plant or train a thicker main trunk horizontally allowing new branches to grow up and then in fall tie or weigh the smaller flexible branches down and cover the whole tree with mulch and a tarp.
In warm climates prune off suckers to grow neat upright fig trees but in a cold climate taller trees are more difficult to protect so keep the suckers, encourage small branches near the soil, and when planting make sure there are growth nodes on the trunk below the ground level. In cases of severe damage these nodes below ground can be exposed in the spring and the tree will regrow and not be lost entirely. Smaller branches can start growing a month earlier in spring and yield more figs than the thicker branches. Ground level side branches can be trained along the ground in a line or all around the tree increasing the leaf canopy area and fruit production. In winter sap is not stored in the roots but it thickens and stops flowing, and the tree's energy is stored under the bark in all of the living wood including roots, trunk, and branches. More trunk, roots, and branches surviving winter means more energy for the tree to begin growth in the spring, more canopy in summer, and more fruit in the fall. Training the main trunk in a straight line (a row) along the ground simplifies winter protection and makes harvest during summer easier. Click Here to see a fig tree where the trunk has been trained along the ground. The tree shown in this video has a lot of energy built up in the horizontal section and it would be a snap to cover in the winter.
Extending The Growing Season
Remove the cover and mulch in spring when the last chance of frost has past. To get more figs you can remove the cover and mulch earlier and replace with a heavy-weight clear greenhouse plastic (not row cover). This warm up he soil earlier and prevent damage to new fig growth down to about 26°F (or 8° F protection) increasing your end of season harvest period by 2 weeks or more. You can remove the cover after the chance of frost has passed. Remember warmer conditions means faster growth and faster fruit set & maturation so a better idea is when it warms a little open the cover at the ends during the hot part of the day to avoid cooking your tree and close it at night until it really warms up above 70° F then remove it entirely. Temperatures can be more than 30°F higher under the plastic during the day so watch it if temperatures get above 60°F. Consider using it again in the fall before first frost to extend your season and ripen those later figs still left on the tree.

Milton Fig Slow Start / May 20 2024
|

Chicago Hardy Fig Tree / May 20 2024
|

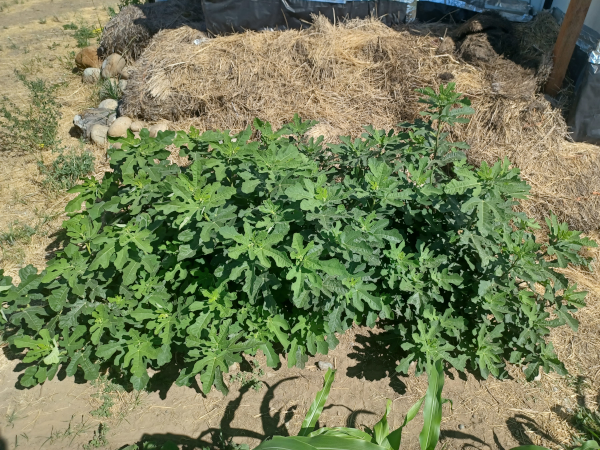
Milton vs Chigaco Hardy / July 14 2024
|
The Milton on the left got a slower start but by mid July vegetative growth is ahead of the Chicago Hardy and it has more figs and larger figs than the Chicago Hardy.
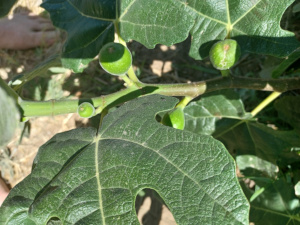
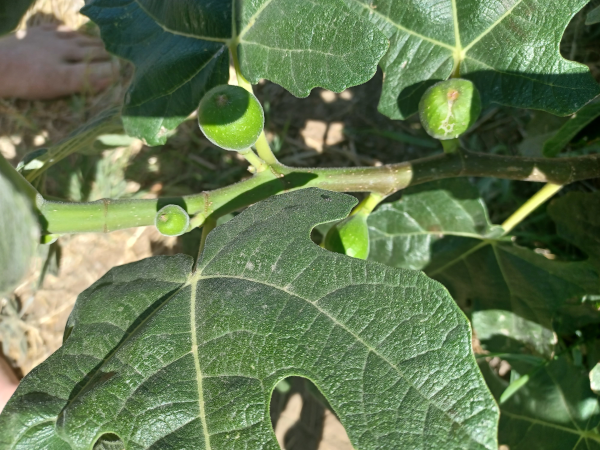
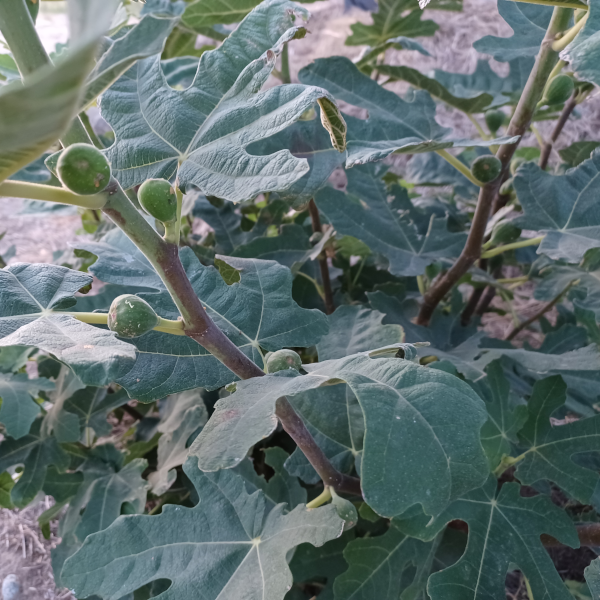
Milton Figs / Jul 14 2024
|
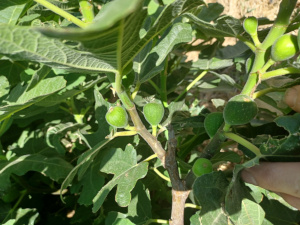

Chigaco Hardy Figs / July 14 2024
|
Fig Propagation
Though some tropical types are extremely difficult to propagate even by air layer, most common figs grown in the US are easily propagated by cuttings.
The #1 most most important factor in rooting fig cuttings is the quality of the cuttings. Cuttings that are old and shriveled or turning yellow under the cambium layer will not grow. Cuttings with a few small buds will be more successful than those without. Fig cuttings can be taken in summer but to get as much fruit as possible it is better to wait till after harvest. Figs may ripen even after a light frost so again it's better to wait till all figs which will ripen, have ripened and been harvested before taking cuttings. Very fresh green cuttings may work but green cuttings purchased online usually aren't fresh enough and mold easily.
The #2 most important factor is that the potting soil should be just barely moist. Wet potting soil will cause cuttings to rot and cuttings can tolerate some dryness as long as there is some humidity. Always use new potting soil for cuttings because old soil may contain mold spores, contaminants, and pests which will weaken or kill new cuttings. Seed starting mix, peat, or coco coir may work but are too heavy so add in 15-20% perlite and 15-20% vermiculite to promote oxygenation while retaining humidity. In general it is a good idea to soak fig cuttings in 3% hydrogen peroxide diluted 1:5 with water for 3 minutes to kill mold, bacteria, and other pests (straight 3% hydrogen peroxide also works).
If doing any number of cutting or indoor plants I highly advise to keep half a pound of gnatrol on stand by. Fungus gnats can be a serious problem even if using fig pop method as they can easily detect moist soil and find a way to deposit their eggs.
I have used Ben's fig pop method to root cuttings with some modifications but now lean to using the shoe box method. The idea of keeping cuttings separated so that fungus gnat and mold outbreaks can be isolated is genius. Another advantage of using the fig pop method is that it's easy to see the roots in the clear bag but the drawbacks are that because the bag is small leaves are easily damaged and it is difficult to control the humidity. If the top is opened to fast the leaves wilt and if opened too slow they may rot.
For the fig pop method I highly recommend using the 4" x 16" 1 mil poly bags as Ben suggests, plastic cups with wrong sized bag and rubber bands around the cup are a hassle. I purchased cuttings online and only buy hard wood cuttings not green cuttings. Sterilize cuttings dilute 1 part 3% hydrogen peroxide to 4 parts water and soak cuttings for 3 minutes then allow to air dry before proceeding. Fill a poly bag half way with moist sterile seed starting mix. Use sharp heavy duty garden shears to re-cut the bottom of the cutting, make a clean cut (below the bottom node and at an angle if possible) without crushing the stem and make sure there is a live green layer all around the cut (most if not all new roots will form here). I have used a PEX pipe cutter but any sharp cutter will do. Optionally scrape the bottom inch of the cutting lenthwise on 2 sides through the node with the sharp side of garden shears or a knife till the green layer is exposed. Scraping is not necessary and may increase the chance that the cutting will rot. Rooting solutions are not necessary but does speed up rooting and increase the survival rate but I do not recommend using rooting powder which dries the fresh cut end. Dip in bottom 1-3 inches in CloneX rooting gel, a small pouch of this is about $5.00 and can do many cuttings. One method is to dip the first cutting heavily in CloneX, put it in a cup of water, and stir it to dilute the CloneX then use the (purple water) mix to dip the rest of the cuttings. If using a bottle of CloneX dispense separately to avoid contaminating the whole bottle. Do not wrap the cutting with parafilm! Put the cutting in the bag with the lower half in the mix and use a postal band to go around the cutting at the soil level and secure over the bottom end of the bag. Leave some media below the cutting as the media at the bottom may be too moist and can promote rot. Poke a few small holes though the plastic in the lower half with a toothpick or tip of small garden pruners to allow the soil to breathe. Partially close the top with tape or a rubber band and place out of direct sunlight. If after a day or two condensation appears in the lower/soil half of the bag the soil moisture is about right. Keep in low light till roots are visible then move to stronger diffuse light. Leaves may appear but try not to transplant till the cuttings have formed strong enough roots. Once roots and several leaves appear open the top in increments to harden off the leaves. It is normal for new leaves to be light green or a bit yellow. Once hardened off and the cutting has several leaves and strong roots it can be repotted. Ben has 3 great step-by-step videos on this, just search for Ben's fig pop method.

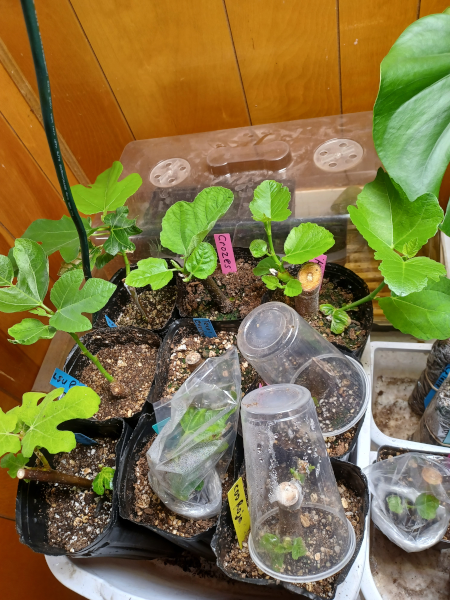
Fig Cuttings / Stragglers
|

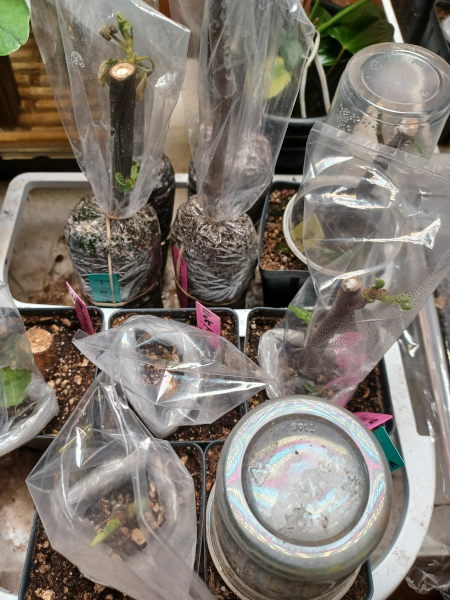
Fig Cuttings / Humidity Adjustment
|


Fig Cuttings / Box Method
|
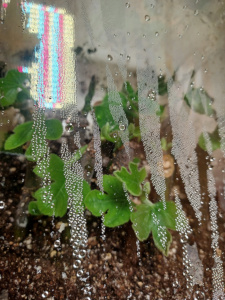
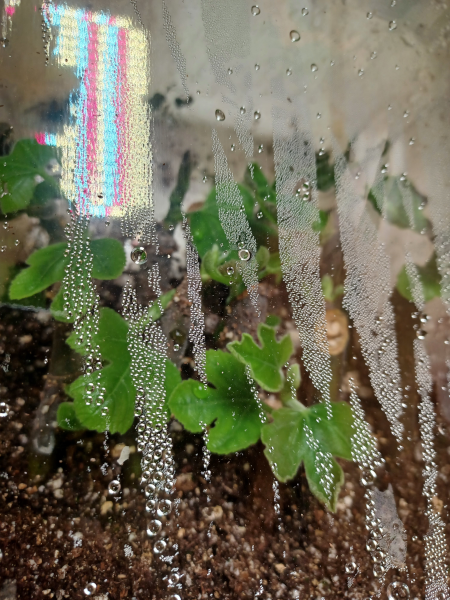
Fig Cuttings / Box Method
|
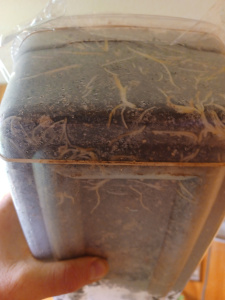

Fig Cuttings / Box Method
|
If I decide to repot and the cutting is weak I use a 3½ x 3½ x 5" deep form pot and cover with a plastic cup or partly rolled up poly bag. If the cutting is stronger I repot into 5½ x 5½ x 9" deep tree pots/bags and if the roots are not strong enough cover with a cup or poly bag. Do not plant too deep. Leave some media below the cutting as the media at the very bottom will retain too much moisture and can promote rot.
If there are many cuttings of the same type the box method works well. Treat the cuttings the same as above but lay them down in a semi-transparent plastic box slanting and/or half covered with potting soil. Cover the box with plastic wrap held in place with rubber bands, add a few holes, and keep in indirect light. I planted 10 Ciliegia Dolce cuttings in a semi-transparent plastic shoe box and only lost one well after transplant stage. Be wary of excessive moisture accumucation at later stages which can cause the leaves to rot and it is a good idea to open the plastic for a short period everyday to let the leaves dry and kill mold, don't overdoo it as they will wilt if the roots are not strong enough.
One of the best methods is to plant cuttings in clear plastic cups and put them into a semi-transparent box with wood chips packed below and between the cups control humidity. Mike Kincaid and The Millennial Gardener have good videos on this method. If growing in a greenhouse or humid climate a covered semi-transparent box is not necessary but in a dry climate or indoors where heating lowers relative humidity it is highly recommended.
Care needs to be taken as there is a fine balance of when to open the container/bag to lower humidity and/or transplant. Keeping the humidity too high can cause the leaves to mold or get bacterial rot. If a transplant is still small but doesn't have a enough roots it will wilt when humidity drops so a good solution is to cover it with a clear plastic cup and gradually open the plastic to adjust the cutting to lower humidity. If the leaves are lost to rot or wilt, the cutting may have enough energy to try several times and may make new leaves again, especially if it was a new bud with leaves and only the leaves died. If the new cutting can't seem to adjust to lower humidity check the stem in the soil to see if there are roots or if it is rotten. If rotten it may be possible to remove the rotten part, sterilize, and try again with a fresh bag and potting soil.
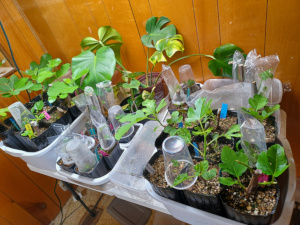
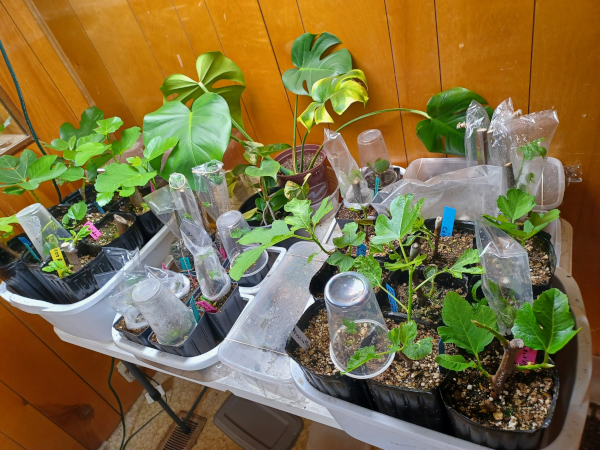
Fig Cuttings
|
Fig Cuttings
|
Failing cuttings which rotted or are not rooting can be fixed (I don't do this for molded cuttings only ones where the bottom rots or doesn't root). If bottom of a cutting rots but the top still has one or more nodes that are still alive just remove the cutting, cut off the rotten part till you find green wood, soak in 1:5 dilution of 3% hydrogen peroxide for 1-3 minutes to sterilize, allow to air dry completely, recut the bottom, and put in a clean bag with clean moist (not wet) potting soil.


Being Creative - Single Node Flipped Fig Cutting
Another method is to take 12-18" cuttings, remove leaves on bottom half, optionally score the sides through the node till the green layer is exposed, optionally dip the cut end in rooting hormone, and plant in a pot with only half the length exposed. If using parafilm, remove all of the leaves and wrap the top exposed part of the cutting. Stretch the parafilm to get a thin layer and only use a single layer over the buds. The parafilm reduces transpiration but the single layer is thin enough for the growing buds to break through. Do not use both parafilm and a plastic bag. If using a plastic bag, remove all but one or two leaves completely and cut the remaining leaves leaving half or less to reduce the transpiration load on the rootless cuttings. Cover the pot with a clear plastic bag and secure the bag with a rubber band to retain humidity. Keep in a shaded location at room temperature for 4-8 weeks. If using a plastic bag periodically open the bag for short periods to control humidity and watch for mold. If the cuttings start to mold take off the plastic. Usually a few won't take so put 3-5 cuttings per 3 gallon pot to save space. Don't give up on any cuttings that have green buds but throw away those that are completely brown and dry. If some cuttings are still green and have 1-2 new leaves emerging, remove the plastic and expose the cuttings to lower humidity and gradually increase light intensity.
Figs can be grown easily from seeds but will not be exactly like the parent(s). I have used dried turkish figs from the store but make sure they are dried naturally and not sterilized at high temperature. Open the dried figs and soak in a bowl of water till soft then separate the seeds from the flesh. Rinse a few times, add more water and pour off leaving the seeds at the bottom. Viable seeds will sink to the bottom. Spread the seeds over wet sand in a wide shallow planting container and cover with a plastic sheet sealed with a rubberband. Leave in the shade to sprout. Some seedlings grow roots on the surface so use a toothpick to make a small hole and use it to put the root into the hole leaving the seed at the top of the hole, replace the plastic. Once the seedlings are touching the plastic, remove the plastic and acclimate to less humid conditions. Add 1/4 strength fertilizer and transplant when 2-6 inches tall.
Harvesting Figs
In warmer climates figs can produce 2 crops (a breba crop and a main crop) but in colder climates where the previous years wood dies during winter only the main/larger crop is produced.
- Breba Crop - first crop produced on previous years branches
- Main Crop - second crop produced in late summer on this years green wood
If there are still many figs on the tree and cold weather is approaching break off any figs forming that will never ripen to provide more energy to the larger figs. About 2 weeeks before the first frost use a Q-tip to dab olive oil on the osteole (eye) at the end of the each fig trapping ripening hormones within and make the figs ripen faster.
Fig Pests & Diseases
Ants, birds, grasshoppers, and black fig fly can damage your fig trees and/or fruit. My figs usually have a little ant damage but they still taste great. For ants mix a sugar water solution with borax and put in plastic bottles laid horizontally with a small hole or tray with cotton buds or paper towels. Ants will bring the solution to the nest killing the whole colony. This year we had a grasshopper festival (at least it was a festival from the grasshoppers point of view) and we sprayed heavily with diatomaceous earth because grasshoppers were stripping the leaves. I did very little to protect my figs and still got a good harvest. Net bags can be used to protect the fruit from birds and other pests and are a good idea if you don't have too many trees. I have found that reflective tape that sparkles as it moves with the wind helps keep away birds, at least till they get used to it.
Fig russet mites, Aceria fici, feed on plant juices and are the main vector to transmit FMV (Fig Mosaic Virus). I have a seen russet mites (which look like fig mites) on crops before and I have microscope but I have never seen a fig mite on my fig trees despite buying from multiple vendors. It may be that fig mites are more of a problem when figs are grown in a greenhouse or a climate where it never gets really cold. Fig mites can be a problem both outdoors and indoors but can't survive long term where figs freeze to the ground and regrow in the spring. Severe infestations of fig mites can cause malformed leaves and reduced vigor and yield both indoors and outdoors. Outdoors they may be less of a problem due to natural predators but it is recommended to monitor outbreaks using a hand held microscope to inspect the underside of plant leaves. Fig mites are extremely small, carrot shaped, white to orange colored, have 2 pairs of legs (4 legs), and look like much smaller versions of immature thrips. These pest overwinter in dormant buds and can easily be brought in on new dormant cuttings. In greenhouses russet mites on cannabis for example are a big problem and to combat the problem cuttings are dipped in a solution of suffoil X during propagation and then isolated in a clean area. In general it is a good idea to dip fig cuttings in 3% hydrogen peroxide diluted 1:5 with water for 3 minutes to kill mold, bacteria, and other pests. Chemical control if mites includes pyrethrins (extract from chrysanthemum) and azadirachtin (extracted from neem oil). Follow application instructions on the bottle and to prevent burn after spraying it is a good idea to keep plants out of direct light at least until the leaves are dry. It is highly recommended to rotate sprays and apply every 2 weeks to prevent mites from developing resistance to a particular treatment. There are several mite predators including lacewing larvae, ladybug larvae, and A. andersonii predatory mite which works on other types of russet mites too. Do not apply predatory mites right after or before a chemical spray as the spray will also kill the beneficials.
FMV (Fig Mosaic Virus) causes Fig Mosaic Disease and is not considered a big issue with most fig hobbyists but severe infections can reduce the vigor of plants and cause malformed leaves as well as light patches or mottling. According to UC IPM, FMV is not transmitted on tools or by seeds but can be transmitted by feeding of a single fig mite, grafting, and vegetative propagation (cuttings). Fig russet mites can weaken plants causing FMV symptoms to appear. Figs that show symptoms of FMV when first rooted from cuttings or when under stress usually outgrow the symptoms. Certain fig cultivars are immune the FMV and plants grown from tissue culture are usually virus free. It is a good idea clean new cuttings with 10% bleach and quarantine new plant material to prevent the spread of mites and or FMV. To treat heavily infected plants cut them to the ground in late fall (regeneration pruning), treat for fig mites if appropriate (get at handheld microscope at least 25X, a 60X is less than $10 online), let them regrow healthy branches in the spring, and then take cuttings from the asymptomatic branches. This helps both the mother tree and generates healthier propagation material. Doing this a second time to the trees generated from the new cuttings (eg take cuttings from cuttings after regeneration pruning) should further reduce FMV symptoms and progressively improve the vigor of successive generations of cuttings. FVM cannot be cured and if the above doesn't work replace the tree. A post from a well known fig grower said he had symptomatic trees next to healthy trress and the healthy trees never got the symptoms, so remember some varieties are resistant (notably seedlings with F. palmata as the male parent).
Indoor Pests
Fungus Gnats are a problem for indoor plants because they have no natural predators in indoors and the larvae will eat the roots of your plants. In a greenhouses and indoors they are a serious issue. Use sticky traps to catch the flying ones and mix 1-2 tsp of gnatrol per gallon and water and apply to surface of all the pots every watering or at least every 2 weeks until the problem is resolved. Always keep a few sticky traps to trap the majority of the flyers and monitor for outbreaks.
During 2023/24 winter I ordered sticky traps immediately after seeing the first gnat and by the time they arrived and put out half a sheet, I caught 3 on the first day. My mistake was using old potting soil for the big pots of 3 tomatoes, 8 physallis, 11 Milton and Chicago Hardy fig cuttings. I had 30 on the traps after 2 weeks so removed as many plants as possible and applied gnatrol to everything else except the covered fig pops. Gnat can also get into fig pop bags. There was a decrease for a few days but they reappeared which probably hatched from pupae which are not affected by gnatrol. I added 6 more full sheets to the room and continued. I did not try sand which fungus gnats do not like but sand would only be effective if put on the top of the soil and also at bottom of pots to stop gnats at the drainage holes. Fungus gnats can smell and locate small holes to infiltrate and lay eggs. I tried neem cake and it did not seem to have any effect. The best treatment is to use sticky traps and 1 Tbsp of gnatrol per gallon every watering.
My fungus gnat infestation never went away entirely till I moved the plants outdoors in the spring.
Lighting
Figs prefer full sun and the more sun the better they do, so plant them in the sunniest location available. If you plan to grow small trees and cuttings during winter months plan to keep them at 70°F, get a 200-400 watt (I used a 2000w equivalent Agilex K2000 but switched to a 4000w K4000) full spectrum led lighting panel and keep them near a south facing window with natural sunlight. I had my plants on an 18 hours schedule but while plants get more energy from longer photo periods they will have a harder time adjusting come spring. I slowly reduced my lights to 12 hours as spring approached. Do not expose new cuttings to cold to simulate a dormancy before their first spring. Wait till all danger of frost is truly passed before putting them outdoors and they will grow vigorously till the end of summer.
Fig Types (Pollination Requirements)
Common figs do not need to be pollinated but some types of figs do need to be pollinated by the fig wasp which only survives in mild climates like Turkey and California. When choosing fig varieties to grow in colder areas make sure to buy common figs unless you plan to hand polinate them for breeding. For example getting Desert King which is a San Pedro fig that produces a large breba crop is a bad idea for my location because most of my old wood does back (no brebas) and the second crop requires a pollinator (no fig wasps).
- Common Fig (female fig that does not need to be pollinated)
- Smyrna Fig (female fig that does need to be pollinated)
- San Pedro Fig (male & female parts on breba crop and female only on the main crop that requires pollination)
- Capri Fig (male fig for pollination and considered not edible)
Cold Hardiness - Survival, Dormancy & Fruit From Dieback
A well known fig grower in zone 7b said among the many varieties he tested there was no difference in hardiness and that he believes hardy figs are a myth. I do not agree and there are different measures of "hardiness" so fig growers discussing hardiness are not always talking about the same thing. Reluctance to break dormancy in spring, spring frost tolerance after breaking dormancy, fruit production after dieback, fruit susceptibility to damage by last frost (brebas) or first frost (main crop), and the absoulute lowest temperature a fig tree can tolerate without dying may or may not be related or can have a varying impact on yield for each cultivar. In 2024 I had many varieties of figs grown from cuttings which were hit by an unexpected frost and from these the Malta Black and Green Ischia cuttings had the least initial damage to their leaves but after a week the Malta Black(s) dropped all their leaves and then took much longer than any others varieties to come out of dormancy. A fig slow to come out of dormancy might be a desirable trait in an area with frequent unpredictable spring warming followed by frosts. My in ground Chicago Hardy came out of dormancy much faster than my in ground Milton fig 5 feet away but the Milton quickly caught up and by mid July had more figs and bigger figs. My conclusion is that figs varieties do differ in response to weather conditions.
Over several years I have noticed that my in ground trees die back less and less each year despite even colder temperatures. I have not significantly improved the method I use to protect them and am starting to believe that over time established trees develop tolerance for colder temperatures and suffer less winter dieback.
Breaking Dormancy & Removing Buds To Stimulate Fruiting (an experiment)
After the frosts which damaged the new cuttings some varieties including Sao Miguel Roxo, Malta Black, and Black Bethlehem took a long time to come out of dormancy. During propagation I noticed that cuttings with large terminal buds took longer to break bud than those which developed new buds and had the idea that terminal buds might be extending dormancy. I had 2 dormant Malta Black planted next to each other that were similar size and state so broke off all of the buds on one of them as a test. New buds quickly developed in the place of the ones that were removed and both plants developed new leaves at exactly the same time and size and developed at the same rate for the rest of the year. While breaking off the buds didn't seem to to cause any setback, it also didn't stimulate an earlier break of dormancy.
In early September though I noticed 6 developing ½ inch figs on the Malta Black where I had removed the terminal buds in May but no figs on the other one. A Removal of buds may stimulate fruit production.


Malta Black Pinched / Before
|


Malta Black UnPinched / Before
|


Malta Black Pinched / After
|


Malta Black UnPinched / After
|
Fig Cultivars
Chicago Hardy fig is a Mt. Etna type fig that is widely available and commonly sold at nurseries but is not the most vigorous, biggest, or best tasting cold hardy fig. My Milton is more vigorous, more productive, and produces earlier, larger, and better tasting figs. I enjoyed the figs so much in 2023 I bought many cuttings new varieties. I am most interested in cold hardy types that are known to fruit from die back since both of my figs have died back to the ground the first few years (they survived to grow back and fruit the next year). In 2023/24 fig trees survived winter temperatures of -13°F with 18mph wind with no snow cover. These figs were only covered with straw and a tarp. Branches up to 18" long survived and continued growing in the spring (eg not 100% dieback) and grew bigger than any previous years.
Fig enthusiasts sometime group similar type figs into catagories like Hivernenca, Mt. Etna, and Coll de Dama. Figs can also be catagorized by flavor profile which can include notes of honey or sugar combined with figgy, mellon, berry, peach, cherry, nutty, spicy, or other flavors even cotton candy. Generally complex berry/fruity flavors are more highly prized.
Several fig cultivars are distinct phenotypically but are genetically the same which means they are the same plant but look, grow, or taste different from each other. This is still under research but plants with the exact same genes (eg clones) can be different if over time some genes become more active or less active due to secondary modification. The DNA interacts with proteins, is coiled more tightly around histones in the nucleus, or is otherwise modified (eg methylation) which changes the activity of the genes coded in the DNA. These modifications occur over time (just like true mutations in genes) and can be carried on to cuttings. This is called epigenetic inheritance.
Spacing & Planting Depth
For fig trees planted in the ground best spacing is 5-8 feet apart but if you have limited water or are testing figs can be planted closer like berries or a hedge. In 2024 we planted a 3x30 foot bed with a double row 1'8" apart and a second 40 foot bed with a double row 1'6" apart (88 figs total). Next year we may take cuttings of the best and plant with 6' spacing and rows 10' apart. Our 2 original fig trees are 5 feet apart with a single dripper each and despite being only 4' tall they are crowding each other so for long term in ground planting an 8' spacing is ideal.
| Fig Planting Map West to East | ||
West Planting Bed (52 trees #NW -> #SE)
|
East Planting Bed (36 trees #NW -> #SE)
|
Larger In Ground Trees (2 trees #W -> #E)
|
Listed below is probably ripening order of figs that I have or wish to have, partially resourced from this blog Early Ripening Fig Varieties.
- Rhonde De Bordeaux (Aug 6-10th - hardy to 0°F)
- Improved Celeste (Aug 9-20th)
- Florea (Aug 3rd - Hardy to -10°F)
- Mt. Etna Types
- Black Bethlehem
- Black Greek
- Crozes (lat 48.5 ripened Aug 30th 2024)
- Dark Portugese
- Hardy Chicago
- Hardy Hoboken (cutting failed supposed to be very virgorous and cold hardy)
- Malta Black (Aug 9th)
- Marseilles Black (Aug 17th)
- Milton Unk. (lat 48.5 ripened Sep 5th 2024)
- Red Lebanese Bekka Valley (cutting failed)
- Sao Miguel Roxo (later ripening Mt. Etna type)
- Pastillere
- Hative d'Argenteuil (cutting failed)
- LSU O'Rourke
- Atreano (wish list)
- LSU Purple
- LSU Tiger
- Nordland (wish list)
- Longue d'Aout
- Brooklyn White
- Kadota
- Texas Everbearing
- Violette de Bordeaux
- Celeste
- White Triana (wish list reorderd)
- Green Ischia
- Lattarula (early green fig)
Extra Notes
- Bass - Well known fig collector owner of Trees of Joy in Bethlehem PA.
- Baud - Well known french fig collection with more than 300 varieties
- CDD - Coll de Dama - a long neck fig translates to Lady's Collar (The Queen of Figs)
- Harvey C. - Figaholics has a huge collection of fig cultivars aprox. 350 in California.
- Hivernenca - A grouping of fig cultivars with similar characteristics.
- Ira J. Condit - A UC Riverside horticulturalist and author of Fig Varieties: A Monograph.
- KK - Fig hobbyist source a vigorous Black Madiera (King of Figs) cultivar.
- Marius - Fig collector in Ohio
- Milton - A fig I acquired from a Polish family in Milton Washington near Seattle.
- Mount Etna - A grouping of fig cultivars with similar characteristics (includes Hardy Chicago).
- MP - Monserrat Pons is a well known fig collector in Catalan.
- Sal’s EL (a fig variety that ripens Aug 10th - 5b-6a)
- TJ - Thomas Jefferson brought Marsellies White to USA and promoted it.
- WillsC - A collector with many cuttings www.willsfigs.com/ourfigs.com in Florida.
Fig Import Warning
Overseas vendors may not provide a phytosanitary permit and without it imported fig cuttings will be destroyed by customs. Please check vendors location to determine if a phytosanitary certificate AND a pre-approved import permit are required. The customs website says vendors is responsible for providing a phytosanitary certificate (the buyer is responsible for the import permit) but the letter I got said the shipment was missing a required phytosanitary permit and that I could be liable for civil penalties and a fine and it would be passed on to the Postal Authorities for resolution. So in short check government regulations for your region or buy within your region.
Fig Resources
I found that Ross Raddi @ FigBoss is a great resource but be warned that many of the figs he reviews are his "best tasting" or "favorite fig" and you may end up getting the fig bug and buying more figs than you intend. Other useful resources include Fig Database, Our Figs, Mountain Figs, Trees Of Joy, The Fig Company. Etsy, EBay, Amazon, and garden centers usually have figs for sale. For harder to find types check out Fig Bid and Figaholics. Don't forget to lookup Ben's fig pop videos.
Fig Ripening (September 2024)
Many of the new figs in the East planting bed have set fruit and a few in the west planting bed. Figs in the east (plastic lined) planting bed have grown much faster and many are more than 2 feet tall with multiple branches. Cherry Cordial has grown very well and had 3 larger figs and I removed the others which are too small to ripen in time. I have been removing any tiny figs most of which are near the tips of the branches. I'll list here figs of note in order of ripening.


Milton Figs / Sep 4 2024
|


Chicago Hardy Figs / Sep 4 2024
|
- Crozes ( Aug 30 ) - One tree in the east planting bed had 1 ripe fruit ripened and picked on Sep 2nd. I waited till it was hanging down on the branch so it would be more jammy but it was probably ready by (Aug 30). I only had one so while eating I really concentrated on the flavor. It had a sweet figgy taste and I'd have to really strech my imagination to say if it had any kind of berry or (other) fruit taste. It had a little seed crunch, more crunch than I remember the Milton having. I'd have to say it tasted like an average sweet fresh fig and hope the flavor is better next year. It was larger than Chicago hardy (about 25g) though smaller than the largest Milton figs which are still forming.
- Milton - I noticed a cluster of figs on the southwest side of the tree that are sligghtly soft and turning purple. They are bigger than I remember from previous years and significantly larger than the Crozes. The leaves and growth of the Milton look similar to the newly planted Dark Portugese but I need to wait till next year to compare fruiting trees. I harvested 2 of these figs on September 5th at about peak ripeness. These have little seed crunch and the skin was not very chewy, just soft with a nicely jammy interior. While I really had to try and imagine flavors with the Crozes these were not as figgy, not berry, but had a sugar peach flavor and about 45 seconds after the last bite I noticed a distinct allspice/star anise/cinnamon taste concentrated in the skin. After tasting this it is little wonder I went "fig crazy" 2023/24 winter and bought a bunch of new types. This is still my best fig so far.
- Chicago Hardy - This tree ripened figs 5 days after the Milton on September 10th and after trying quite a few the fruit isn't noticably different from the Milton. The Milton breaks from dormancy later in the spring, is more vigorous, produces more fruit, and may ripens a little earlier.
- Cherry Cordial - There are only 3 small figs on this tree but they are almost ripe and turning purple as of September 25 2024.


Milton Figs / 2024
|


Milton Fig / Weight
|


Milton Figs / Cut
|


Milton Figs / Cut
|
By September 25th 2024 out of 100's of figs not many have ripened so I cut down the corn that was partially shading the fig trees and cut off the branch tips above the first fig. This let it more light to the lower leaves/figs, and after a couple early cool weeks the weather has warmed up again.